I’m going to guide you through the steps to clean C drive, generally known as the local disk C, in Windows 11 in this post. The process is simple, yet it yields excellent results. Because we are not using any third-party tools to carry out this cleaning procedure, you will not be required to download any additional shady software. In addition, did you know that if you remove any unnecessary files from your C drive, it will enable Windows to function significantly more quickly?
Table of Contents
How to Make Laptop Fast?
To Make your laptop fast like new you need to follow some cleaning and optimizations, when you use your laptop over time there are many temporary files generated and makes the laptop slow, and mostly these temporary files are stored in c drive, hence clearing the temporary files regularly may help you make the laptop fast so clean c drive frequently.
Here are Six of the well known techniques to clean and optimize your laptop fast, whether it a windows 10 or windows 11 laptop these technique should work for both.

Step 1: Cleaning C drive
In this step, we are going to go over how to remove the unwanted files from your C drive. We will delete those files that are produced automatically for temporary usage and are being utilized by your system to store data while it is running applications or creating permanent files. These files are referred to as “temporary files”.
However, after the software is stopped, it serves no use other than to waste the valuable storage space that you have. As long as you properly follow the instructions, there is no need for concern since you will not be deleting anything of importance.
So, right-click on your start button and choose “run” from the menu, which will open the run box.
You may also use the keyboard shortcut Windows key + R to instantly open your run box.
Clean c drive – temp files

Once here, enter in Temp and click OK, which will open the temp folder and may prompt you to allow administrator permission to view the folder; just click OK and the contents of the folder will be shown to you; now, select all of these files, (you can press ctrl + A to select all the files) and press the shift + delete keys on your keyboard.
It may refuse to remove any of the files or directories inside the temp folder because, as previously said, it was created temporarily and is being utilized by certain applications while we do it. So tick the option “do this for all current things” and click the skip button, which will keep the currently utilized temporary files but delete the remaining.
Clean c drive – %temp%

Close the folder and open the run box again, this time typing %temp% into the run box. Simply click OK and another folder will appear, similar to the last one. Select all the items inside the folder and hit shift key + delete on your keyboard, Choose Yes and click Continue to grant permission for this action. Check the box “Do this for all current items” and hit-skip. If there are any currently undeletable files, you can just leave them there. Close the folder, and that’s pretty much all you can do here.
Clean c drive – prefetch
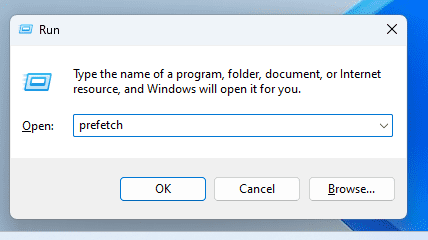
Close the folder and open the run box again and this time type “prefetch” into the run box.
simply click Continue and a folder will appear, similar to last one. Select all the items and press Shift + Delete on your keyboard, choose Yes.
This will delete all the pre fetched files and make your pc fast.
Step 2: Empty Recycle Bin
Many of us are aware of this, but I believe the majority are not. It may seem minor, but I believe it is important to mention when it comes to restoring some of your valuable system storage. When you delete a file using the right-click delete option or the delete key on your keyboard, it does not erase the files from your computer; instead, it keeps all deleted items in your recycle bin until a specific limit is reached, which in Windows 11 is somewhere around 5% of the disk capacity.
You can always use the shift + delete keys to permanently erase a file from your computer, but what if you forget? Because the recycle bin uses C Drive space, deleting anything without using the shift + delete keys may ultimately wind up someplace on your C drive or system drive, causing your system to slow down, particularly if you have an almost full C drive partition.
So, if you don’t clear your recycle bin regularly enough, it will take up a significant amount of space on your C drive, lowering your overall system performance.
So let’s go to your recycle bin and delete everything in there. You’ve just freed up another massive amount of system storage. I hope you do this on a regular basis.
But wait, it isn’t done yet. We can do a few more things, maybe better than what you just saw in the previous steps.
Step 3: Disk Cleanup
Taking this step will ensure that anything else that isn’t required has been removed from your C drive. To do this, go to your start menu and type “disk clean up.” Now, from the results, click on “disk clean-up,” which will send you to this little box, where you may choose your C drive and click OK.
The disk cleaning window will now show; from here, choose almost everything unless you wish to skip a specific category; in that case, uncheck the relevant folder from the clean-up list. Once you’ve done your selection, just click the “Clean-Up system files” button, which will prompt you to pick the drive again, so choose your C drive and click OK, and it will perform a scan to discover all the residual unnecessary junk on your C drive.
So, select again and press OK, which will display a warning notice asking whether you are sure you want to delete these files permanently. So, click Delete Files, which will begin the cleaning process and clear your C drive. It may take some time, depending on how much junk we are dealing with, or how long it has been since you cleaned your C drive. When you’re finished, you can close it.
Step 4: Uninstall unwanted apps
In this step, we’ll go through how to uninstall any software or apps that you no longer need. In this step, we are going to go over how to remove from your computer any software or applications that you do not need or that you only use rarely. These programs and software are often loaded onto your C drive by default.
Therefore, if you delete those unnecessary apps from your computer’s C drive, you will free up a significant amount of storage space. And to do that, you will need to go to the start menu and search for “Add or remove programs.” Once you click on it, you will be taken to the apps and features section of your Windows settings. Here, you will be able to see all of the apps or programs that have been installed in your Windows 11 operating system. All you need to do is scroll through them all and look for any programs that are rarely used or that appear to be malicious.
Once you have found them, click on the menu with the three dots on the side. If it is an app that you have installed from the Microsoft Store, it will get uninstalled from your system at this point. If it is software that you have installed from outside of the Microsoft Store, like a regular program, it will typically run its own uninstallation wizard, so follow the on-screen instructions and get it done.
Do the same thing for any other app or program that you consider unnecessary or that you only use occasionally, and that will be all you can do in this section.
Step 5: Optimization
This step is only necessary for individuals who are still using a hard drive. If you are using an SSD as your boot drive, you may completely skip this step, as it will not be of any use to you in any case. So let’s start, Start by going to the Start menu on your computer and searching for “Defragment and Optimize Drives.” Simply clicking on the result will bring you to the current window. Make sure that your C drive is selected from this menu, It is possible to do it to a solid-state drive, but doing so won’t bring any potential benefits.
Once you’ve selected the drive, click on “optimize,” and it will get your C drive optimized. Depending on the amount of data that is stored on a standard hard disk, defragmenting and optimizing the drive might take a significant amount of time. Therefore, show persistence and give it the necessary amount of time; I can assure you that the wait will be well worth it. Once it’s done, you can close it.
Step 6: Storage Sense
This is the last and last step that I am aware of that may help you in further cleaning your C drive or in keeping it clean. It is not going to do everything automatically, but for clearing certain unwanted stuff, it could benefit you in the long run if you do this. Keeping your computer clean is one of the most important things you can do to maintain its integrity.
So, go to your start menu and click on the Settings gear icon.
This will bring up your Windows settings. Then, click on the system menu and go to storage settings. Here, you’ll find the Storage Sense option, so click on it. By default, it will be turned off.
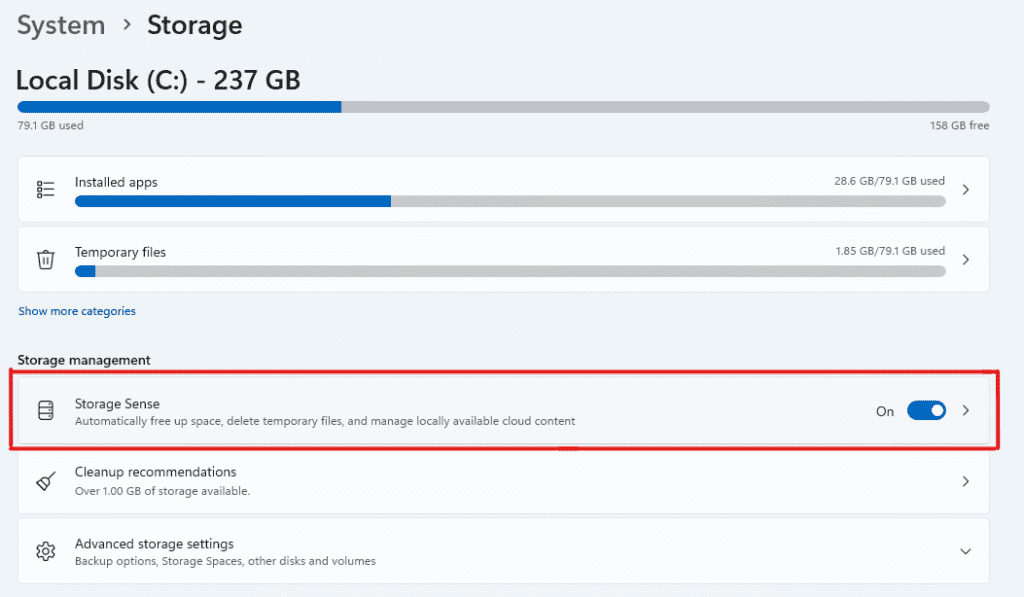
Enable the Storage sense option, which will also enable these sub-settings; you have the choice of leaving them as the default or customizing them in any way you see right, since the instructions for doing so are quite self-explanatory.
In addition, I suggest that you do all of the steps that are listed in the article on a regular basis, as this will help you maintain a clean Windows 11 system. You may clean your C drive in Windows 10 the same way you did in Windows 11 by following those steps.
Watch Video: Make Your PC Fast
Summarize:
How to Make Windows 11 fast:
Step 1: Cleaning
Step 2: Recycle Bin
Step 3: Disk Cleanup
Step 4: Uninstall
Step 5: Optimization
Step 6: Storage Sense
FAQ:
Will Cleaning C Drive make my laptop fast?
In most of the cases temporary files are stored in c drive, hence cleaning your c drive will free up your storage as well as make your laptop fast.
How to Clean C drive?
Clean Temporary files, perform a disk clean up, defragment C drive if it is a Hard Disk, Uninstall Unwanted Software, and you will be able to clean c drive.
Is it Safe to delete Temporary files?
It is safe to delete unwanted temporary files as it is of no use and won’t harm your pc if deleted.
Does C Drive Affect Laptop Speed?
C drive in most of the cases stores all the Operating system files and temporary files, if c drive is full then it will affect laptop speed.
How do I fix C Drive almost full?
Clean c drive and uninstall unnecessary programs, move the documents and other files to the other drive and make some space in c drive.